Getting Started
Introduction
What is Agentic RAG?
Agentic RAG is a method that combines the strengths of retrieval-augmented-generation with autonomous agents.
With vanilla RAG, Vectara receives a user query, retrieves the most relevant facts from your data, and uses an LLM to generate the most accurate response based on those facts. (Unfamiliar with RAG? Check out this page to learn more!)
Agentic RAG leverages an LLM to “manage” the process of answering the user query via reasoning, planning, and a provided set of “tools”. Since a “manager” LLM-powered agent is in charge, it is smart enough to analyze the user query and properly call tools to obtain a comprehensive response to a complex user query.
For example:
The agent can rephrase the user query to fit a certain style, role, or persona.
The agent can break the query down into multiple (simpler) sub-queries and call the RAG query tool for each sub-query, then combine the responses to come up with a comprehensive response.
The agent can identify filtering criteria in the user query and use them to filter the results from the RAG query tool.
The main tool used in vectara-agentic is the Vectara RAG query tool, which queries a Vectara corpus and returns the most relevant response. By using a RAG-based agent, you
mitigate some of the issues with pure LLMs, particularly hallucinations and explainability.
Another important tool that can be used to query a Vectara corpus is the Vectara search tool, which queries a Vectara corpus for the most relevant search results and documents that match a query.
Additional tools give your application superpowers to retrieve up-to-date information, access enterprise specific data via APIs, make SQL queries to a database, or even perform actions such as creating a calendar event or sending an email.
Let’s demonstrate the advantage of Agentic RAG via a simple example.
Imagine that you have ingested into Vectara all your Google Drive files, JIRA tickets, and product documentation. You build an Agentic RAG application using these tools:
A JIRA RAG query tool
A Google Drive RAG query tool
A product docs RAG query tool
A tool that can issue SQL queries against an internal database containing customer support data
Consider the query: “What is the top issue reported by customers in the last 3 months? Who is working to solve it?”
A standard RAG pipeline would try to match this entire query to the most relevant facts in your data, and generate a response. It may fail to distinguish the query as two separate questions, and given the complexity, may fail to produce a good response.
An Agentic RAG assistant would recognize the complexity of the user query, and decide to act in two steps. First it will form a query with its SQL tool to identify the top issue reported by customers in the last 3 months, and then it will call the JIRA tool to identify who is working on that issue from the first query.
What is vectara-agentic?
Vectara-agentic is a Python package that allows you to quickly and easily build Agentic RAG applications, powered by Vectara. It is based on LlamaIndex and provides a simple API to define tools, including a quick way to generate Vectara RAG tools.
It also includes some pre-built tools that you can use out-of-the-box for various purposes (such as legal or finance), and provides access to a wide range of LLMs through integrations with OpenAI, Anthropic, Gemini, Together.AI, Cohere, GROQ, and Fireworks AI.
Agent Architecture
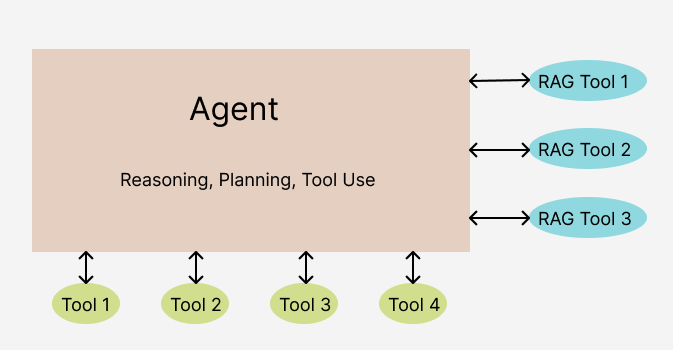
Vectara-agentic follows a typical agentic RAG architecture. It consists of the following components:
One or more RAG tools for making queries to corpora in Vectara.
A set of additional tools that the agent can use to retrieve information, process data, or perform actions.
A central LLM, or agent (based on
ReAct,OpenAI,LATS, orLLMCompileragent type) that manages the process of interpreting the user query, creating and executing a plan to collect information needed to respond to that query, and crafting a final response.
Basic Example
The most basic application you can make with vectara-agentic is an agent with a single RAG tool that can pull information from a Vectara corpus.
Let’s see how this is implemented in code:
from vectara_agentic.agent import Agent
from vectara_agentic.tools import VectaraToolFactory
from pydantic import Field, BaseModel

import os
from dotenv import load_dotenv

load_dotenv(override=True)

api_key = str(os.environ['VECTARA_API_KEY'])
customer_id = str(os.environ['VECTARA_CUSTOMER_ID'])
corpus_id = str(os.environ['VECTARA_CORPUS_ID'])


vec_factory = VectaraToolFactory(
  vectara_api_key = api_key,
  vectara_customer_id = customer_id,
  vectara_corpus_id = corpus_id
)

class QueryPetPolicyArgs(BaseModel):
    query: str = Field(..., description="The user query.")

ask_pet_policy_tool = vec_factory.create_rag_tool (
    tool_name = "ask_pet_policy",
    tool_description = "Responds to questions about Vectara's pet policy.",
    tool_args_schema = QueryPetPolicyArgs,
    summary_num_results = 10,
    n_sentences_before = 3,
    n_sentences_after = 3,
    mmr_diversity_bias = 0.1,
    include_citations = False
)

agent = Agent(
    tools = [ask_pet_policy_tool],
    topic = "Vectara Pet Policy"
)

agent.chat("What is Vectara's pet policy?")
When we run this code, we get the following response:
Vectara’s pet policy does not allow common household pets like cats and dogs on their campuses. Instead, they welcome a select group of exotic creatures that reflect their innovative spirit and core values. Additionally, birds are not only permitted but encouraged in their workspace as part of their unique approach.
In the above code, we defined a single RAG tool (ask_pet_policy_tool) for our Agent class, and then created an AI assistant with this tool.
The above code demonstrates the typical flow for instantiating your Agent object when you are defining more than one tool,
only in this case it only used a single tool.
Since making a simple assistant like this with just one RAG tool is a common need, we have provided a single function that does all of this at once called from_corpus().
Here’s how you can create a simple assistant that uses a single RAG tool for asking questions about Medicare:
agent = Agent.from_corpus(
  vectara_customer_id=customer_id,
  vectara_corpus_id=corpus_id,
  vectara_api_key=api_key,
  data_description="medical plan benefits and pricing",
  assistant_specialty="Medicare",
  tool_name="ask_medicare",
)
Try it Yourself
To run this code yourself, add the following environment variables to your console or a .env file:
Vectara Corpus:
VECTARA_CUSTOMER_ID: The customer id for your Vectara account. If you don’t have an account, simply create one to get started.
VECTARA_CORPUS_ID: The corpus id for the corpus that contains the Vectara pet policy.
You can download the Pet Policy PDF file and add it to a new or existing Vectara corpus.
VECTARA_API_KEY: An API key that can perform queries on this corpus.
Agent type, LLMs and model names:
VECTARA_AGENTIC_AGENT_TYPE: Agent type, either OPENAI (default), REACT, LATS, or LLMCOMPILER (make sure you have an OpenAI API key if you use the OpenAI agent).
VECTARA_AGENTIC_MAIN_LLM_PROVIDER: The LLM used for the agent, either OPENAI (default), ANTHROPIC, GEMINI, TOGETHER, COHERE, BEDROCK, GROQ, or FIREWORKS.
Note that to use the OPENAI agent type, you must use OPENAI as the main LLM provider.
VECTARA_AGENTIC_TOOL_LLM_PROVIDER: The LLM used for the agent tools, either OPENAI (default), ANTHROPIC, GEMINI, TOGETHER, COHERE, BEDROCK, GROQ, or FIREWORKS.
OPENAI_API_KEY, ANTHROPIC_API_KEY, GOOGLE_API_KEY, TOGETHER_API_KEY, COHERE_API_KEY, BEDROCK_API_KEY, GROQ_API_KEY, or FIREWORKS_API_KEY: Your API key for the agent or tool LLM, if you choose to use these services.
With any LLM provider choice, you can also specify the model type to use via these environment variables:
VECTARA_AGENTIC_MAIN_MODEL_NAME: specifies the model name for the main LLM provider.
VECTARA_AGENTIC_TOOL_MODEL_NAME: specifies the model name for the tool LLM provider.
Defaults:
For OPENAI, the default is gpt-4o.
For ANTHROPIC, the default is Claude-3-5-Sonnet-20241022.
For GEMINI, the default is gemini-1.5-flash.
For TOGETHER.AI, the default is Meta-Llama-3.3-70B-Instruct-Turbo.
For COHERE, the default is command-r-plus.
For BEDROCK, the default is anthropic.claude-3-5-sonnet-20241022-v2:0.
For GROQ, the default is llama-3.3-70b-versatile.
For FIREWORKS, the default is Firefunction-v2.